-
cPanel
-
- Mailing Lists
- Default Address
- Autoresponders
- Forwarders
- Email Accounts
- Spam Filters
- Track Delivery
- Global Email Filters
- Email Filters
- Address Importer
- Encryption
- Email Disk Usage
- Calendar Delegation
- BoxTrapper
- Configure Greylisting
- Email Routing
- Filter Incoming Emails by Domain
- Email Deliverability
- Authentication (SPF and DKIM)
- Show Remaining Articles ( 4 ) Collapse Articles
-
-
WHM
-
- SSH Password Authorization Tweak
- Apache mod_userdir Tweak
- SMTP Restrictions
- Compiler Access
- Configure Security Policies
- Password Strength Configuration
- cPHulk Brute Force Protection
- Security Questions
- Manage External Authentications
- Two-Factor Authentication
- ModSecurity™ Vendors
- ModSecurity Configuration
- Manage root’s SSH Keys
- Manage Wheel Group Users
- Host Access Control
-
- Terminate Accounts
- Quota Modification
- Modify an Account
- Change Site’s IP Address
- Create a New Account
- Manage Account Suspension
- Upgrade/Downgrade an Account
- Limit Bandwidth Usage
- Force Password Change
- Email All Users
- Reset Account Bandwidth Limit
- Password Modification
- Skeleton Directory
- Rearrange an Account
- Raw Apache Log Download
- Modify/Upgrade Multiple Accounts
- Web Template Editor
- Unsuspend Bandwidth Exceeders
- Show Remaining Articles ( 3 ) Collapse Articles
-
- Articles coming soon
-
- Articles coming soon
Update Preferences
Log in to your whm>> Server Configuration>>Update Preferences
After logging into the WHM, please go to Home » Server Configurations » Update Preferences. This is where you can configure the cPanel update options.


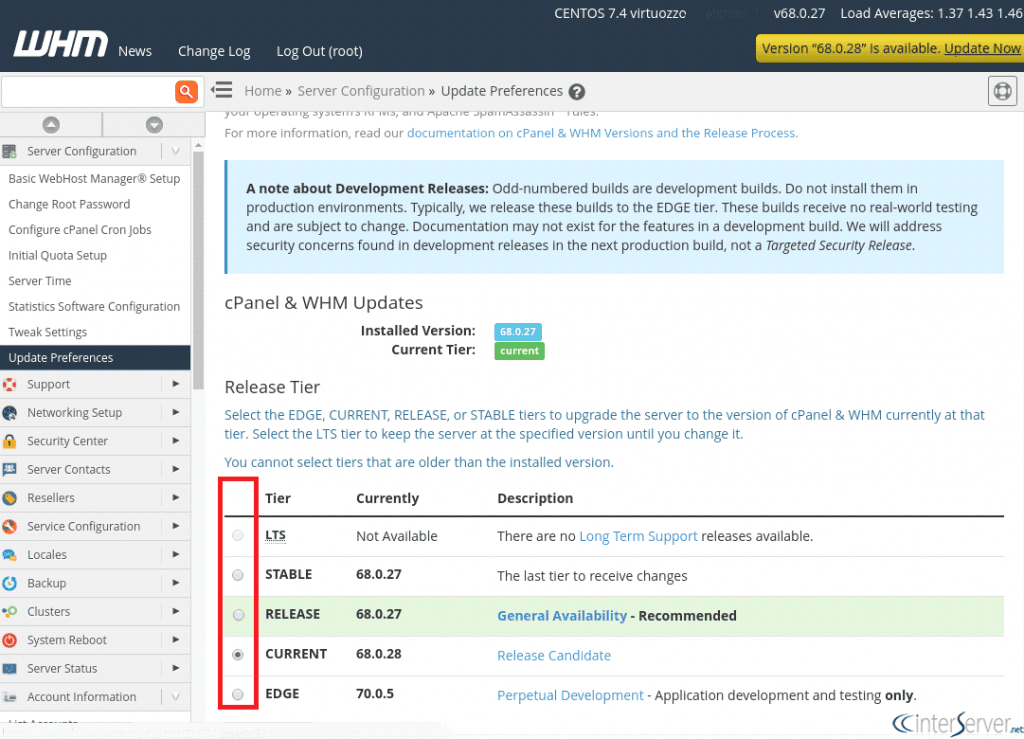
Select Release Tier
Now, you will be redirected to the update preferences page and there you could see many options. The first feature is to select the release Tier. You can see different release tiers of the WHM. You can select the required one. Description about a tier will be provided at the right side end.
The available tiers can be listed as follows.
1) EDGE
2) CURRENT
3) RELEASE
4) STABLE
5) LTS
The recommended option is “RELEASE”


Next option will allow you to set how often the cPanel should be updated. You can see available options listed there. I am listing those here for reader’s convenience.
1) Automatic
2) Manual Updates Only
3) Never Update
Automatic: You can select this option if you want the WHM to update automatically. This will be done at midnight, daily.
Manual: If this option is selected, you will need to update the WHM manually. You can update the cPanel installation from WHM Home » cPanel » Upgrade to Latest Version.
From the command line, you could upgrade the cPanel installation using the below script.
# /scripts/upcp
Never: If the never option is selected, cPanel/WHM will not be updating.
Select Staging Directory
You can select the staging directory from the same window. You could refer the below screenshot for clarification in this.


OS Package Updates and Apache Spam Assassin Rules Updates
You could also update OS Packages and Apache Spam Assassin Rules Updates. This also provides us the below options.
1) Automatic
2) Manual Updates Only
3) Never Update
Once the changes are done, you need to click on the “Save” button to save the changes made. A screenshot is added for reference.


This is how we can set the update preferences from the WHM.
