
-
cPanel
-
- Mailing Lists
- Default Address
- Autoresponders
- Forwarders
- Email Accounts
- Spam Filters
- Track Delivery
- Global Email Filters
- Email Filters
- Address Importer
- Encryption
- Email Disk Usage
- Calendar Delegation
- BoxTrapper
- Configure Greylisting
- Email Routing
- Filter Incoming Emails by Domain
- Email Deliverability
- Authentication (SPF and DKIM)
- Show Remaining Articles (4) Collapse Articles
-
-
WHM
-
- SSH Password Authorization Tweak
- Apache mod_userdir Tweak
- SMTP Restrictions
- Compiler Access
- Configure Security Policies
- Password Strength Configuration
- cPHulk Brute Force Protection
- Security Questions
- Manage External Authentications
- Two-Factor Authentication
- ModSecurity™ Vendors
- ModSecurity Configuration
- Manage root’s SSH Keys
- Manage Wheel Group Users
- Host Access Control
-
- Terminate Accounts
- Quota Modification
- Modify an Account
- Change Site’s IP Address
- Create a New Account
- Manage Account Suspension
- Upgrade/Downgrade an Account
- Limit Bandwidth Usage
- Force Password Change
- Email All Users
- Reset Account Bandwidth Limit
- Password Modification
- Skeleton Directory
- Rearrange an Account
- Raw Apache Log Download
- Modify/Upgrade Multiple Accounts
- Web Template Editor
- Unsuspend Bandwidth Exceeders
- Show Remaining Articles (3) Collapse Articles
-
- Articles coming soon
-
- Articles coming soon
PHP Configuration
step 1:Log in to your cPanel>>PHP Configuration>>Advanced
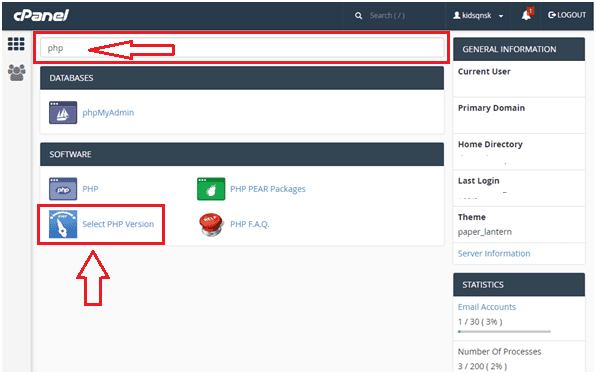
Step 2:Search for PHP version on the cPanel Dashboard
Once you are logged in, enter ‘php’ in the search text box and click the link ‘Select PHP version’ as shown below:
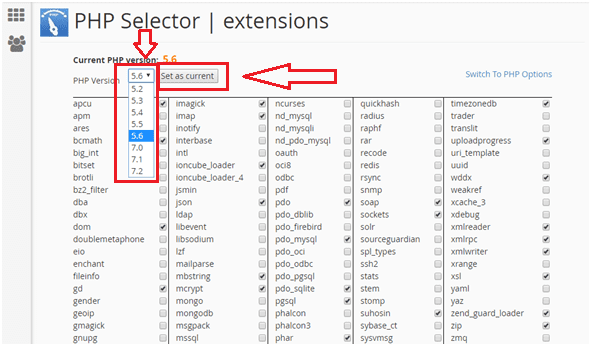
Step 3:Change the PHP version
You can now see the available PHP versions on the next screen as well as all associated PHP modules or extensions. You can click on the drop-down checkbox to switch to your preferred PHP version. For instance, if your software only works with a certain version, choose it from the list as shown below and click ‘Set as current’:
Step 4:Enable/disable PHP extensions
You can also select/deselect any PHP extension from the list by checking/un-checking the box on the right side of an extension name. For instance, to enable ‘my sqli ‘extension, check the box as shown below:
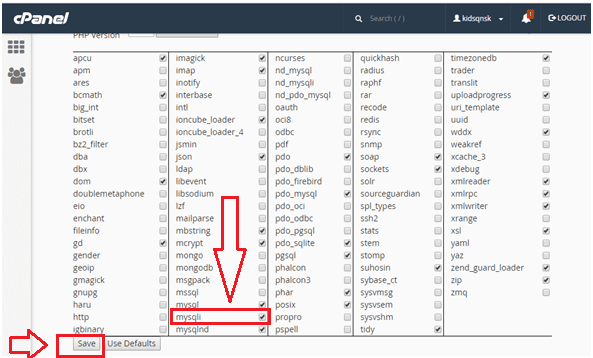
To save the changes, click the ‘Save’ button as shown above.
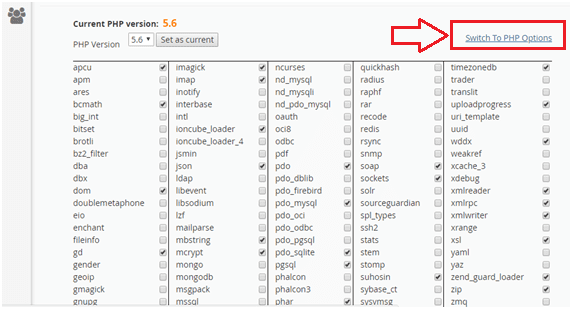
Step 5:Customize PHP options
On the same screen, locate the link ‘Switch To PHP Options’ at the top right and click it as shown below:
On the next screen, you can see different PHP options that you can customize as shown below:
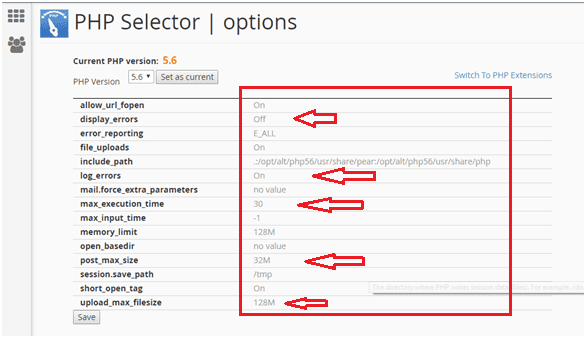
In most cases, you will be tweaking the following options
display errors: This value is ‘off’ by default, if you change it to ‘On’, errors on PHP scripts will be displayed on the browser.
max execution time: This value displays the maximum execution time a script should run. You may set the value to a higher limit if you want.
post max size: This value displays the max value that can be accepted by POST and GET variables. This is most common in web forms.
upload max size: You may tweak this value to adjust the maximum upload file size that should be supported on your website. For instance, if you are uploading a large MySQL database, you might need to adjust this value.