
Address Importer
Log in to your cPanel>> Mail section >> Email address importer
How to Use the cPanel Address Importer
Creating an email account is a relatively simple procedure by itself. However, if you are moving a lot of email accounts to a new domain, it can truly be a daunting task.
You will be happy to hear that there is a fast way of doing it with cPanel. This method can also be used if you have a preset with domains you want to have on a new production website like info@, marketing@ sales@, etc. Furthermore, you can use this to create email forwarders in bulk for a domain associated with your hosting account.
To master the address-importing feature in cPanel, you need to learn:
- How to Prepare a List for Importing
- How to Use the .xls File Format
- How to Use the .csv File Format
- How to Import Email Accounts
- How to Import Email Forwarders
How to Prepare a List for Importing
As you will be importing email accounts of forwarders in bulk, first, you will have to make a list of all the items which you want to import. That can be done both via Excel Spreadsheet (.xls) or Comma separated value sheet (.csv) files. As both files can be created by a multitude of programs on different OS, you will have no issues finding the appropriate tool for your particular setup.
Note
cPanel will not import email address lists saved via the .xlsx file format.
In both formats, you can only use the username of the email or username@domain.com, as we have in our examples. The latter will be converted to username@, followed by the domain which you have selected in the configuration options.
The quotas are set in Megabytes (MB), so if you are doing this on VPS or Dedicated Server and you want one of the accounts to have a 4GB quota, you will have to input that as 4096.
How to Use the .xls File Format
For this example, we have used Microsoft Excel and Notepad++ for creating the two list formats. In .xls, you can separate the elements into different categories:
- Email, Password, and Quota – for Email Accounts.
- Source and Target – for Forwarding.
These are called column headers and are only added for your convenience. They are not required for the import, and you will have the option to skip the first rows of a file when importing.

How to Use the .csv File Format
For .csv, we suggest using commas as a delimiter. However, you can also use space, semicolons, tabs, or other symbols that do not appear in your email or passwords.

How to Import Email Accounts
To start the email accounts import process, first, you must navigate to cPanel → Address Importer.

The Email Accounts option will be selected by default, so you can directly use the Browse button to upload your import list.

Selecting a .xls file will add the option to remove the column headers, and selecting a .csv will provide you with an option to choose the delimiter, as mentioned at the start of the tutorial. Click Next to proceed.

Here, you will see your list as it was perceived by the Address Importer and will be able to change up the column headers if your file has the quotas before the passwords, for example.

Below that, you can use a drop-down menu to select the domain for which you want to add these email accounts, and then click Next.

Finally, you can do a last check of the list with the emails now having the correct domain as part of their address. Click Finish to initiate the actual process.

You will get a confirmation for all of the added email accounts, so check that everything is processed correctly.

As a confirmation, if you now access your Email Accounts section in cPanel, you will see the newly added accounts.

How to Import Email Forwarders
To import a list of email forwarders, access the cPanel → Address Importer tool.

This time, select the Forwarders option in Step 1 of the setup.

As in Section 2, here you will have to browse and select your .xls or .csv file list created as per the instructions in our introduction section and the appropriate delimiter.

If you are having issues creating the list, you can always click on the link labeled Example, which contains two example files that you can just edit with your own data, save, and use.
When choosing the headers from the drop-down menus, select Source and Target if they are not pre-applied by default. The Target will be the email that will receive the emails forwarded from the Source.
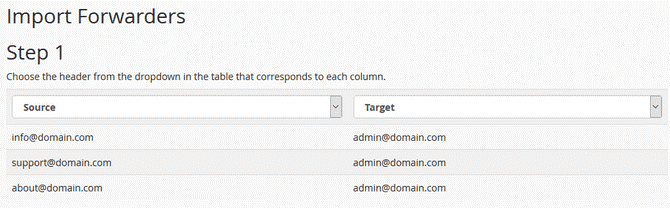
As you will see from the next image, the target’s email address must be correctly added from the start. The selection of a domain for which the forwarders will be created will only affect the Source and not the Destination (Target). This is why all of our Source addresses became @example.com, but the Destination remained @domain.com. All of this should be taken into consideration when creating the import list.

Finally, hit the Finish button to initiate the generation of forwarders. You will be able to track the progress and see if all forwarders are set correctly.

Depending on what you are trying to accomplish, the Address Importer can be a great tool for quickly creating email accounts or forwarders in bulk on your hosting plan.