
-
cPanel
-
- Mailing Lists
- Default Address
- Autoresponders
- Forwarders
- Email Accounts
- Spam Filters
- Track Delivery
- Global Email Filters
- Email Filters
- Address Importer
- Encryption
- Email Disk Usage
- Calendar Delegation
- BoxTrapper
- Configure Greylisting
- Email Routing
- Filter Incoming Emails by Domain
- Email Deliverability
- Authentication (SPF and DKIM)
- Show Remaining Articles (4) Collapse Articles
-
-
WHM
-
- SSH Password Authorization Tweak
- Apache mod_userdir Tweak
- SMTP Restrictions
- Compiler Access
- Configure Security Policies
- Password Strength Configuration
- cPHulk Brute Force Protection
- Security Questions
- Manage External Authentications
- Two-Factor Authentication
- ModSecurity™ Vendors
- ModSecurity Configuration
- Manage root’s SSH Keys
- Manage Wheel Group Users
- Host Access Control
-
- Terminate Accounts
- Quota Modification
- Modify an Account
- Change Site’s IP Address
- Create a New Account
- Manage Account Suspension
- Upgrade/Downgrade an Account
- Limit Bandwidth Usage
- Force Password Change
- Email All Users
- Reset Account Bandwidth Limit
- Password Modification
- Skeleton Directory
- Rearrange an Account
- Raw Apache Log Download
- Modify/Upgrade Multiple Accounts
- Web Template Editor
- Unsuspend Bandwidth Exceeders
- Show Remaining Articles (3) Collapse Articles
-
- Articles coming soon
-
- Articles coming soon
NGINX® Manager
log in your WHM >> Software >> NGINX® Manager
NGNIX is an open-source software for web serving, caching, load balancing, reverse proxy and more. It first started out as a web server for top-notch performance and stability.
With the WHM’s NGINX Manager you can install, uninstall and manage your NGNIX with the reverse proxy and caching server. You can even manage the caching on your server with this interface.
In this guide, we will understand the steps to clear NGINX cache for users from WHM.
Install NGINX Manager:
Note: You should have the root access for WHM to work with the Nginx cache option.
- The first step is, you need to install NGINX Manager on your WHM server.
- To do so, go to login to your WHM account, here WHM interface will appear.
- On the right-hand side of the pane, in the Search Tools and Accounts, search for NGINX Manager.
- Click on Install, and then you will get this window after the installation process is complete.
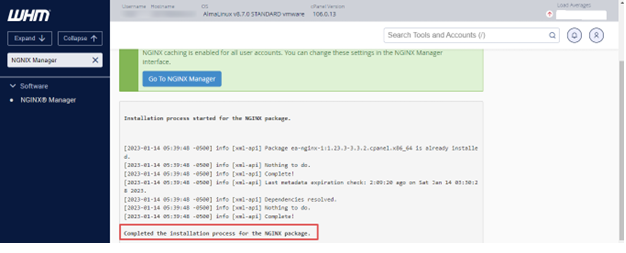
- Now, Go to NGINX Manager.
Related: Steps to Configure Nginx for WordPress Statistics and Permalinks
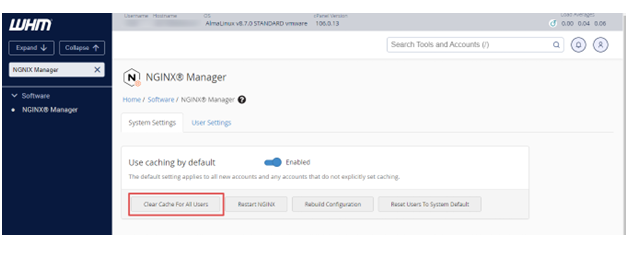
Here, you will get to see the System Settings and User Settings.
- To clear cache of a particular user, select the checkbox you wish to clear and then, click on Clear Cache.

In the System Settings, you have the option to Clear Cache for All Users. You can clear the cache for multiple users. To do so, select the usernames you want to clear or select the checkbox above the table to select all the visible users. Then, click on the Clear NGINX Cache.
Also, in cPanel, you have the option to Activate and Clear Nginx Cache as shown in image given below:

That’s it!