How Can We Help?
-
cPanel
-
- Mailing Lists
- Default Address
- Autoresponders
- Forwarders
- Email Accounts
- Spam Filters
- Track Delivery
- Global Email Filters
- Email Filters
- Address Importer
- Encryption
- Email Disk Usage
- Calendar Delegation
- BoxTrapper
- Configure Greylisting
- Email Routing
- Filter Incoming Emails by Domain
- Email Deliverability
- Authentication (SPF and DKIM)
- Show Remaining Articles (4) Collapse Articles
-
-
WHM
-
- SSH Password Authorization Tweak
- Apache mod_userdir Tweak
- SMTP Restrictions
- Compiler Access
- Configure Security Policies
- Password Strength Configuration
- cPHulk Brute Force Protection
- Security Questions
- Manage External Authentications
- Two-Factor Authentication
- ModSecurity™ Vendors
- ModSecurity Configuration
- Manage root’s SSH Keys
- Manage Wheel Group Users
- Host Access Control
-
- Terminate Accounts
- Quota Modification
- Modify an Account
- Change Site’s IP Address
- Create a New Account
- Manage Account Suspension
- Upgrade/Downgrade an Account
- Limit Bandwidth Usage
- Force Password Change
- Email All Users
- Reset Account Bandwidth Limit
- Password Modification
- Skeleton Directory
- Rearrange an Account
- Raw Apache Log Download
- Modify/Upgrade Multiple Accounts
- Web Template Editor
- Unsuspend Bandwidth Exceeders
- Show Remaining Articles (3) Collapse Articles
-
- Articles coming soon
-
- Articles coming soon
< All Topics
Print
Cloudflare
Posted
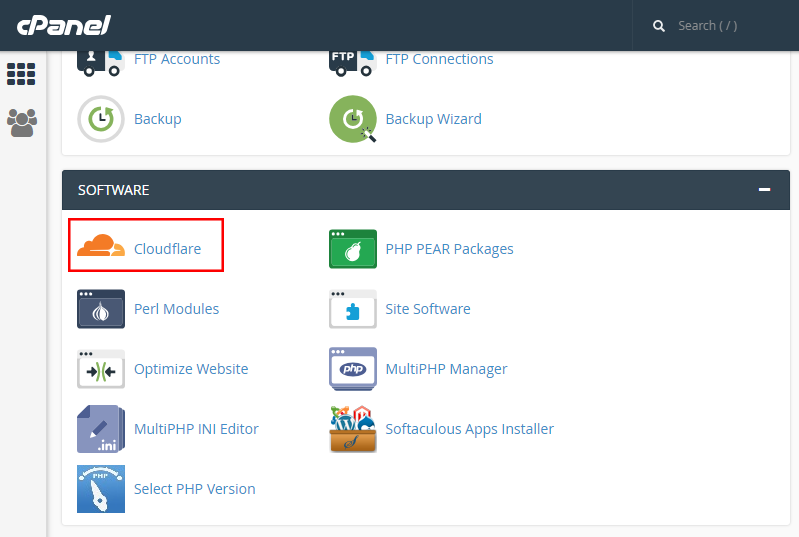
Log in to your cPanel>>Software>>SSH Access
Configure and Enable Cloudflare.
- Under the Software section, click Cloudflare.

- Click Create Your Free Account to create an account with Cloudflare. If you already have an account you can click Sign in here.

You can configure Cloudflare in two ways from the cPanel
| CNAME Setup | Full DNS Setup |
|---|---|
| In this configuration, your domain name points to your authoritative DNS and only subdomains (example: www.mydomain.com, blog.mydomain.com) are pointed to Cloudflare. This configuration works only with CNAME records and if you wish to configure using A records you will need to configure using Full DNS setup. | In this configuration, you need to update your domains current name servers to Cloudflare’s name servers. This will make Cloudflare’s name servers as the authoritative DNS for your domain name. When using Full DNS Setup the traffic for your entire website is routed through Cloudflare which results in faster load times of your website. |
CNAME Setup.
- To enable Cloudflare using CNAME setup, click Provision Domain with CNAME Setup.

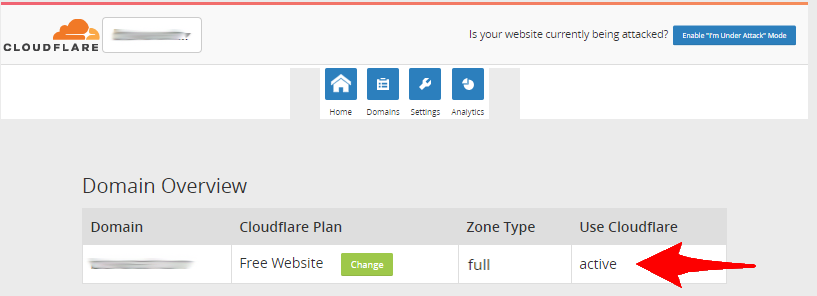
- You will see the status of your domain under Use Cloudflare column as Active.
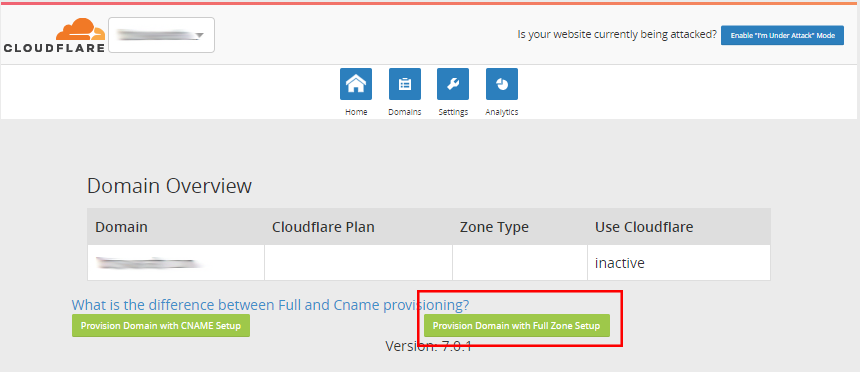
Full DNS Setup.
In this configuration, you need to update your domains current name servers to Cloudflare’s name servers. This will make Cloudflare’s name servers as the authoritative DNS for your domain name.
NOTE:Allow up to 24 hours for these changes to be processed.
- To enable Cloudflare using Full DNS setup, click Provision Domain with Full Zone Setup.
- Update your domain’s name servers so that they are using the name servers provided by Cloudflare.
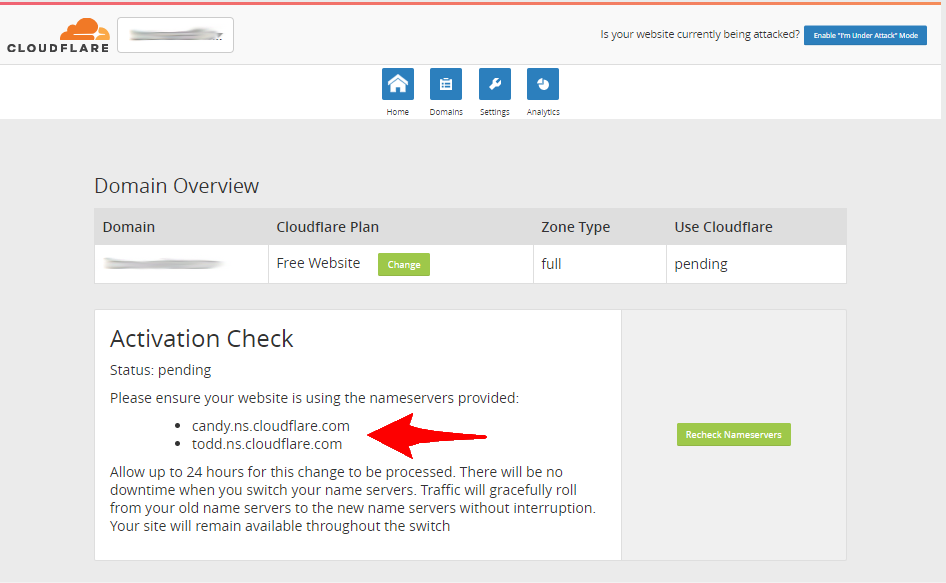
- When configured successfully the status of your domain under Use Cloudflare column will change to Active.