-
cPanel
-
- Mailing Lists
- Default Address
- Autoresponders
- Forwarders
- Email Accounts
- Spam Filters
- Track Delivery
- Global Email Filters
- Email Filters
- Address Importer
- Encryption
- Email Disk Usage
- Calendar Delegation
- BoxTrapper
- Configure Greylisting
- Email Routing
- Filter Incoming Emails by Domain
- Email Deliverability
- Authentication (SPF and DKIM)
- Show Remaining Articles ( 4 ) Collapse Articles
-
-
WHM
-
- SSH Password Authorization Tweak
- Apache mod_userdir Tweak
- SMTP Restrictions
- Compiler Access
- Configure Security Policies
- Password Strength Configuration
- cPHulk Brute Force Protection
- Security Questions
- Manage External Authentications
- Two-Factor Authentication
- ModSecurity™ Vendors
- ModSecurity Configuration
- Manage root’s SSH Keys
- Manage Wheel Group Users
- Host Access Control
-
- Terminate Accounts
- Quota Modification
- Modify an Account
- Change Site’s IP Address
- Create a New Account
- Manage Account Suspension
- Upgrade/Downgrade an Account
- Limit Bandwidth Usage
- Force Password Change
- Email All Users
- Reset Account Bandwidth Limit
- Password Modification
- Skeleton Directory
- Rearrange an Account
- Raw Apache Log Download
- Modify/Upgrade Multiple Accounts
- Web Template Editor
- Unsuspend Bandwidth Exceeders
- Show Remaining Articles ( 3 ) Collapse Articles
-
- Articles coming soon
-
- Articles coming soon
PostgreSQL Database Wizard
Step 1:Log in to your cPanel>>database section >> PostgreSQL Database Wizard
Step 2: Look under the Databases section for the PostgreSQL Database Wizard. Click it to open the Wizard.


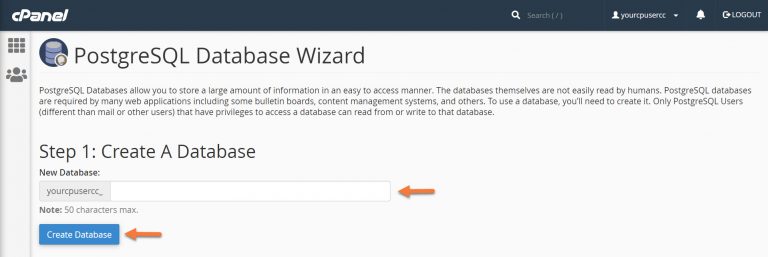
Step 3: You will be given the option to give your database a name:


Important Note There is a 50 character limitation on the database name, including the part before the _.
After giving your database a name, click the blue Create Database button.
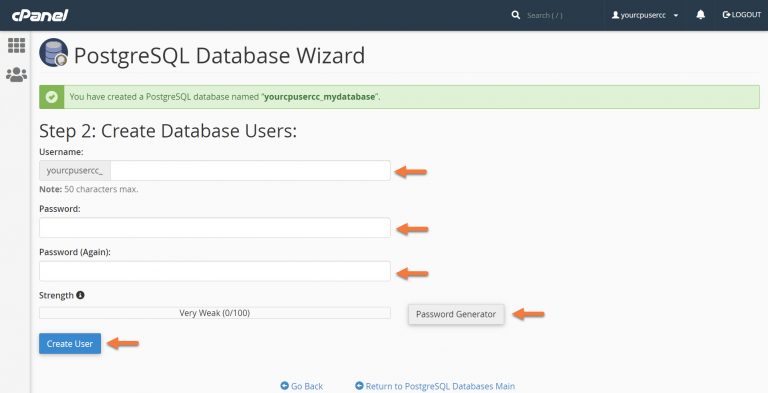
Step 4: Next you will have the option to create a username and password for the new database.


Be sure to use a secure password. If you need to generate one, use the Password Generator.
When you’ve entered the username + password, click the blue Create User button.
Step 5: Next, you will need to add the user to the database so that it has permission to access the database.


Click the Submit button to do this.
