
How Can We Help?
-
cPanel
-
- Mailing Lists
- Default Address
- Autoresponders
- Forwarders
- Email Accounts
- Spam Filters
- Track Delivery
- Global Email Filters
- Email Filters
- Address Importer
- Encryption
- Email Disk Usage
- Calendar Delegation
- BoxTrapper
- Configure Greylisting
- Email Routing
- Filter Incoming Emails by Domain
- Email Deliverability
- Authentication (SPF and DKIM)
- Show Remaining Articles (4) Collapse Articles
-
-
WHM
-
- SSH Password Authorization Tweak
- Apache mod_userdir Tweak
- SMTP Restrictions
- Compiler Access
- Configure Security Policies
- Password Strength Configuration
- cPHulk Brute Force Protection
- Security Questions
- Manage External Authentications
- Two-Factor Authentication
- ModSecurity™ Vendors
- ModSecurity Configuration
- Manage root’s SSH Keys
- Manage Wheel Group Users
- Host Access Control
-
- Terminate Accounts
- Quota Modification
- Modify an Account
- Change Site’s IP Address
- Create a New Account
- Manage Account Suspension
- Upgrade/Downgrade an Account
- Limit Bandwidth Usage
- Force Password Change
- Email All Users
- Reset Account Bandwidth Limit
- Password Modification
- Skeleton Directory
- Rearrange an Account
- Raw Apache Log Download
- Modify/Upgrade Multiple Accounts
- Web Template Editor
- Unsuspend Bandwidth Exceeders
- Show Remaining Articles (3) Collapse Articles
-
- Articles coming soon
-
- Articles coming soon
< All Topics
Print
Module Installers
Posted
log in your WHM >> Software >> Module Installers
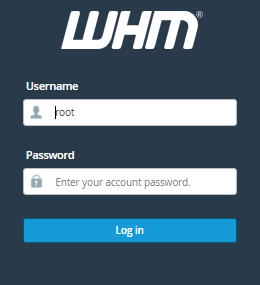
1. You need to log into your “WHM account as root user”
2. Enter “Software” in the search bar
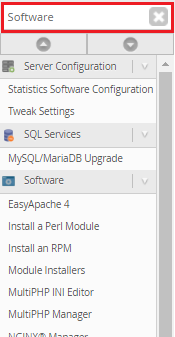
3. Now, Click on the “Install a Perl Module tab” to continue

4. Now, “Install the Perl Module”

We sincerely hope that you must now have got a clear idea regarding the Installation of a Perl Module in WHM. However