-
cPanel
-
- Mailing Lists
- Default Address
- Autoresponders
- Forwarders
- Email Accounts
- Spam Filters
- Track Delivery
- Global Email Filters
- Email Filters
- Address Importer
- Encryption
- Email Disk Usage
- Calendar Delegation
- BoxTrapper
- Configure Greylisting
- Email Routing
- Filter Incoming Emails by Domain
- Email Deliverability
- Authentication (SPF and DKIM)
- Show Remaining Articles ( 4 ) Collapse Articles
-
-
WHM
-
- SSH Password Authorization Tweak
- Apache mod_userdir Tweak
- SMTP Restrictions
- Compiler Access
- Configure Security Policies
- Password Strength Configuration
- cPHulk Brute Force Protection
- Security Questions
- Manage External Authentications
- Two-Factor Authentication
- ModSecurity™ Vendors
- ModSecurity Configuration
- Manage root’s SSH Keys
- Manage Wheel Group Users
- Host Access Control
-
- Terminate Accounts
- Quota Modification
- Modify an Account
- Change Site’s IP Address
- Create a New Account
- Manage Account Suspension
- Upgrade/Downgrade an Account
- Limit Bandwidth Usage
- Force Password Change
- Email All Users
- Reset Account Bandwidth Limit
- Password Modification
- Skeleton Directory
- Rearrange an Account
- Raw Apache Log Download
- Modify/Upgrade Multiple Accounts
- Web Template Editor
- Unsuspend Bandwidth Exceeders
- Show Remaining Articles ( 3 ) Collapse Articles
-
- Articles coming soon
-
- Articles coming soon
Manage root’s SSH Keys
Managing SSH Keys with WHM
To manage SSH keys, follow this guide, as it will show you how to add, import, and manage them with your server. SSH keys will be divided into two types: public and private.
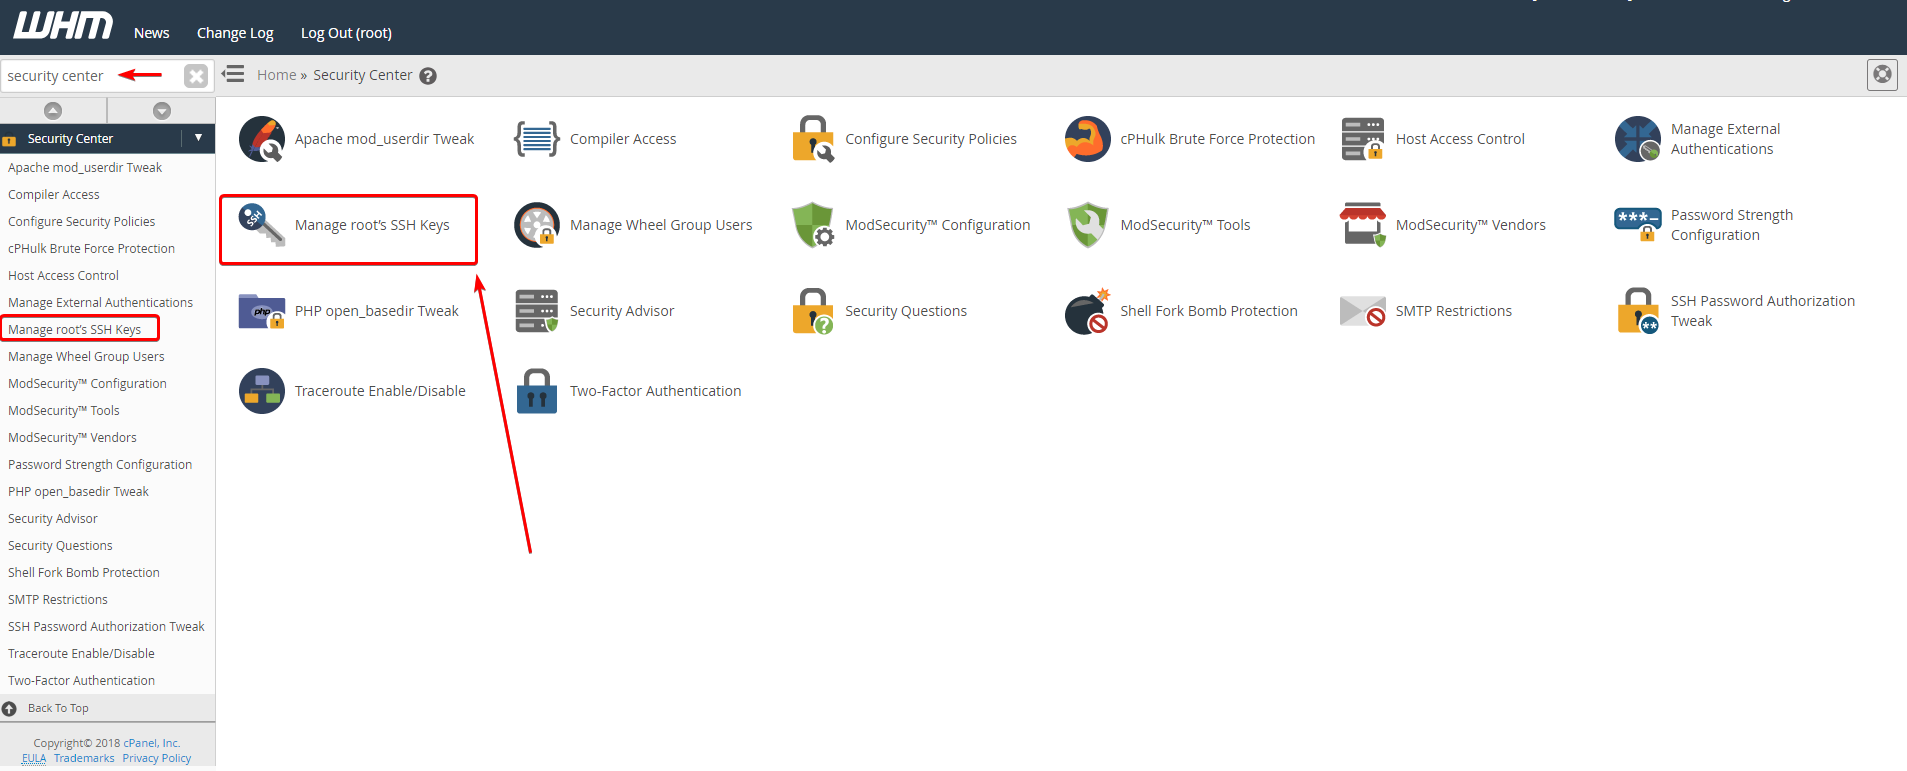
Log in to your whm>>security centre >>Manage root’s SSH Keys
Step 2: Click on the Security Center button


Step 3: Click on Manage root’s SSH Keys button


You can equally search for the security center in the WHM search box in the top left and then click on Manage root’s SSH Keys under the available options within the column.
How Do I Generate A New SSH Key?
This section will show you how to generate a new key, public or private.
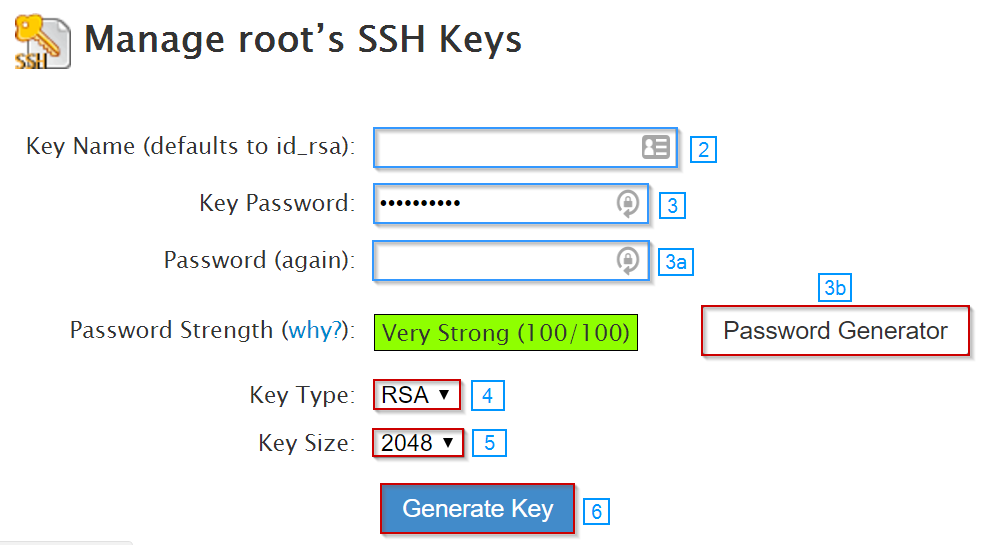
Step 1: Click the Generate New Key button.


Step 2: Create a unique key name in the Key Name text box
Step 3: Enter a password for the key name if you wish
- 3a: Confirm password, if necessary
- 3b: You can use the Password Generator to generate a random password
Step 4: Pick your preferred Key Type
- RSA – Faster verification times
- DSA – Faster generation and signing times
Step 5: Select your preferred Key Size
Larger the size, the better the security, but the slower the authentication speed
Step 6: Click the Generate Key button


How Do I Import An SSH Key?
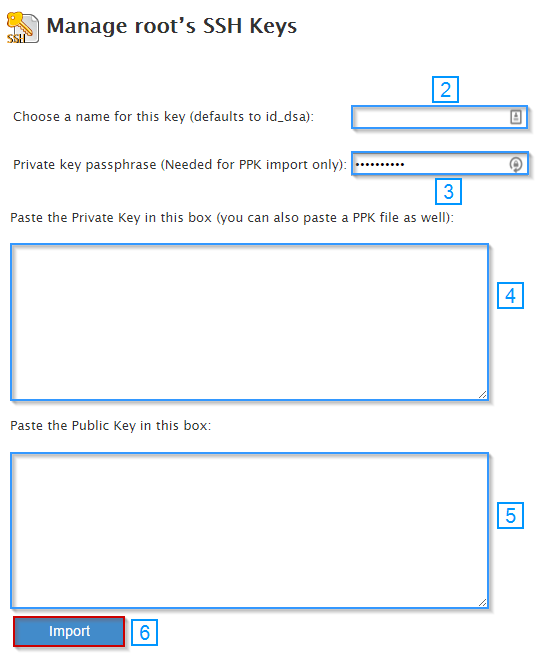
Step 1: Click the Import Key button.


Step 2: Create a custom key name in the first text box
a. When you create a custom key name, the SSH key must be specified when you log in to server b. To be specific, you’ll need to run the following command:
ssh user@ example -i /root/.ssh/key_ name
Step 3: Enter the Private key passphrase in the text box if you’re using a PPK (PuTTY Key Generator) file
Step 4: Paste the Private key into the box
Step 5: Paste the Public key into the box
Step 6: Click the Import button


How Do I Manage The Keys?
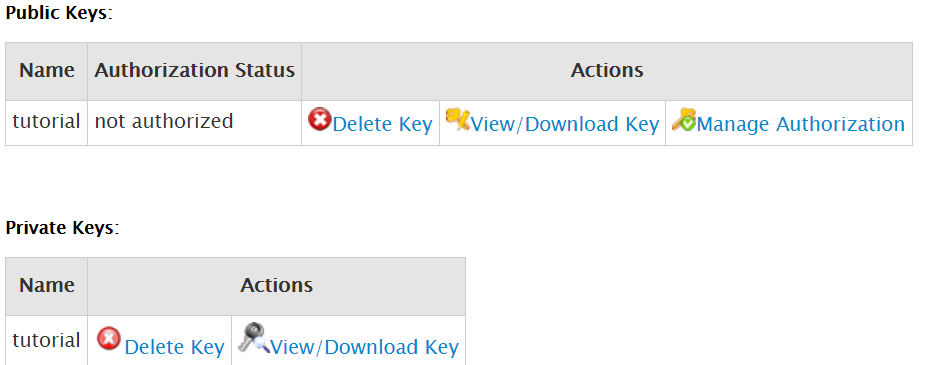
You can manage the keys you create and import through the Public and Private Keys tables at the bottom of the Manage root’s SSH Keys section. You can perform the following actions: Delete Key, View/Download Key, and Manage Authorization.


